
This guide explains how to preconfigure Proxmox VE to run an OPNsense firewall as a virtual machine. Proper preparation of the Proxmox host is essential to ensure secure network segmentation, reliable performance, and a smooth OPNsense installation.
You will learn how to set up network bridges, assign physical interfaces, and apply best‑practice settings that allow OPNsense to operate as a fully functional virtual firewall. The focus is on creating a clean and flexible foundation that can be adapted to both lab environments and production use.
By completing these preconfiguration steps, Proxmox will be ready to host OPNsense efficiently, giving you full control over routing, firewalling, and network security within your virtualized infrastructure.
Now let’s finish setting up Proxmox.
First, we need to assign the physical network interfaces to OPNsense:
- 1× WAN port
- 1× LAN port with VLANs
- 1× DMZ port (optional, if you plan to use a DMZ)
LAN2 (nic1) → OPNsense WAN → directly connected to your existing router

LAN3 (nic2) → LAN with VLANs → connected to your VLAN-capable switch

LAN4 (nic3) → DMZ → for example, directly connected to your NAS or other Switch (optional)Code-Sprache: JavaScript (javascript)
Creating the bridges in Proxmox
Go to System → Network and click Create → Linux Bridge.
You only need to create bridges for the three required interfaces:
- WAN
- LAN
- DMZ (optional)
Start with:
WAN:

LAN (with multiple VLANs for network segmentation):
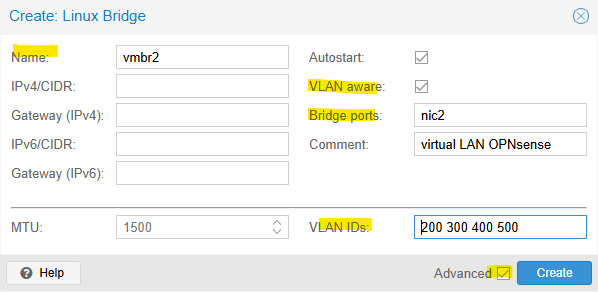
Example VLAN IDs: 200, 300, 400, 500 — each VLAN represents a separate network with its own services.
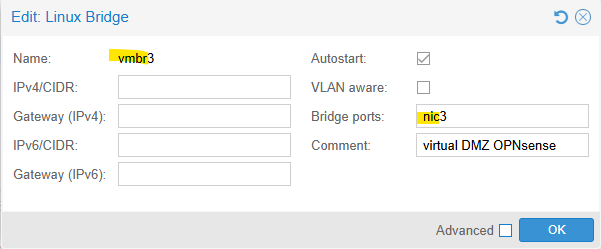
DMZ (optional):
A DMZ (Demilitarized Zone) is a separate network segment used to host services that need to be accessible from outside the internal network, while keeping the internal LAN isolated and protected.
Then click Apply Configuration

The switch port connected to the OPNsense LAN interface requires the following VLAN configuration:
1U (untagged)
200T (tagged)
300T (tagged)
400T (tagged)
Next Step: Creating an OPNsense VM in Proxmox